How I got my (weaving) groove back

A few days ago, I mentioned I wasn’t into weaving. Even though I thought I was at the time. Funny how that works, right?

Well, I picked it up the next day and this is what I’m weaving. I knew the reason for the dislike had everything to do with the fibers that I’d chosen, but I honestly didn’t feel like sorting through a “proper” fiber and so I embroidered.

Loom Weaving_2 11.23.14
Weaving mistakes


Check out the above picture. Pretty awful, right? I still have a lot to learn. Look closely, my tension is all over the place. Do you see those edges? Weaving is my newest craft. In fact, I received my 32″ Kromski Rigid Heddle loom on December 16, 2013. So, it’s been almost a year.

Loom Weaving_3 11.23.14
Warping the loom: Fixing my mistakes


And as you can see I still make mistakes. See those knots in the above picture? This was my fix for a mistake that I’d made.  I skipped two holes, while I was warping the loom. Of course, I did not notice this until I started weaving! I noticed right away.  As I moved the shuttle back and forth I racked my brain for a quick fix. It took a while and when it finally hit me, I could have smacked myself for not thinking of it sooner.  I cut the offending yarns, thankfully they were at the end, and rethreaded them through the holes. I then used more fiber to connect the now shortened fiber and just wound the loom past that point. Problem solved!

Loom Weaving_4 11.23.14
Homemade shuttle made of cardboard

Another dilemma I experienced was the size of my shuttles. They are large. I needed something small to correspond with this fabrics width. What’s a lady to do? A quick “hack” was to make a shuttle out of cardboard! It’s definitely not permanent since constant use will make it soft.


Loom Weaving_1 11.23.14

I finally got into the groove and started weaving and the fabric looks much better. There’s still room to improve and that’s fine. I’m making progress, hooray!

Weaving and embroidery in progress

Today, I got around to doing some weaving; however, I didn’t weave too long since I was simply not feeling the process.

I’m sure we’ve all been there right? We want to engage in a craft, but when we actually get that time, we no longer want to do that. Sometimes, I can push through that and other times (like this evening) I know I better stop since I’m not in that mindset. It was a bit disheartening, especially when you thought you were ready to roll.  Since I did want to do “something,” I pulled out that ruffled shirt that I’d been sewing and decided to add some embroidered butterflies to the side. You know, just like the machine embroidered butterflies, that I had added to the pants, but these would be done in a different color.

Shirt Embroidery_4 11.22.14
Embroidery machine stitching the butterflies


In the above picture, you see what is going on while the machine is embroidering.

Shirt Embroidery_1 11.22.14


And here’s an example of the completed project. It’s still shows the markings of my chalk pencil. As I mentioned before, it’s important that the placement of your design is accurate.

Shirt Embroidery_3 11.22.14


This shirt isn’t finished. I think I’ll add bead work to some of the butterflies and I do believe, that I’ll remove the sleeves and redo them. Before I sew them together, I might embroider some butterflies to the sleeves. I’ll see how it looks (via paper placement of the design) before I make my decision.


Embroidered butterflies on a pant leg

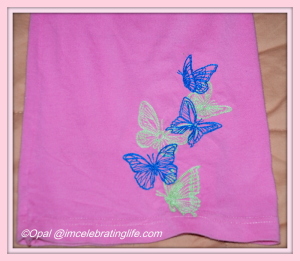
Last evening, I embroidered these pants for my daughter.

“These pants” are technically mine; however, one day they found their way into her drawer. . . Yes, my 11 year old daughter can now wear my clothes! My how they grow, right?

Embroidered pants_1 11.21.14
Daughter posing in embroidered pants


I will say, that this was a great stitch out. The above embroidered design was over 22,000 stitches. Before I could even think about stitching, I had to measure where I wanted the design placed. I then pulled out one of my rulers and started marking the fabric with my chalk pencil.

This “could” have been hooped, but it wouldn’t have been a fun time for me because of the narrow width of the pant leg. To avoid this, I pulled out my newest seam ripper and started ripping out a side seam.

The bottom stabilizer was floated on the 5×7 hoop and on the wrong side of the pant leg. Two pieces of water soluble stabilizers were placed on the top aka right side of the pant leg. I doubled up on the top, because I noticed puckering when I initially started embroidering. So, why did I experience some puckering? The pants material is made out of a very lightweight knit. Additional support was needed to protect the fabric from all the stitching. In some places, there are numerous stitches. I most likely could have avoided doubling if I had medium or definitely heavyweight water soluble stabilizer on hand. 

I did make one major mistake.

Embroidered pants_3 11.21.14


Can you spot what I did incorrectly? I should have swapped colors since the blue is darker than the green butterflies.

Embroidered pants_2 11.21.14


You know what? My daughter isn’t complaining and she received a lot of compliments about her pants today at school. I would say that these embroidered pants were a success!

She attends a private school and they normally have to wear a uniform, but since they had a walk-a-thon they were allowed to wear casual clothes.

Machine Embroidery: Loving these bags

A few days ago, I finished this bag. The only thing left to do was add some type of tie. Originally, I’d planned on purchasing ribbon and then it dawned upon me… I have yarn! I could simply crochet a string or knit and icord.

Embroidered Bag_crochet draw string 11.20.14

I chose this color and crocheted a cord. My daughter thought it should have been magenta or electric blue. Neither one of those colors are in my yarn stash now.

Embroidered Bag_2 11.20.14

I also made this bag. My daughter loves it even more than the first and asked could she swap. Did I mention she already is using the first bag and it now has a permanent home in her bookbag.

To complete this project, I used two machines; machine embroidery and sewing machine. Additionally, I hand basted some stitches and I crocheted a cord for the first bag.

Accessories: I love functional, but pretty is nice too

Two days ago, my 20 pound sadiron and 16 pound old electric pressing iron arrived in the mail! I must say that I’m pleased with both of these items that I bought off of Ebay.

American Beauty Iron and Sad Iron

Just look at them! These are solid metal irons,  there’s nothing fancy about them. The one on the left weights 20 pounds and other, the American Beauty iron is 16. Of course, I already gave them a test drive and I must say that I like them a lot. I will be honest and say that I’ll have to get used to the added weight and that’s fine. I’m thrilled to have them.

Below, you’ll see my newest seam ripper. I’m loving its simple elegance.

Brass Seam Ripper_1 11.20.14
Brass Seam Ripper

Not only is it gorgeous, but it’s sharp. So… it’s functional also.

Brass Seam Ripper_2 11.20.14
Brass Seam Ripper

You can’t go wrong with having extra seam rippers. Because of their size they can easily be misplaced, but the good news is that I’m not misplacing them anymore. The fix was simple, just put them back into their designated spot immediately after use!