Last evening, I embroidered these pants for my daughter.
“These pants” are technically mine; however, one day they found their way into her drawer. . . Yes, my 11 year old daughter can now wear my clothes! My how they grow, right?

I will say, that this was a great stitch out. The above embroidered design was over 22,000 stitches. Before I could even think about stitching, I had to measure where I wanted the design placed. I then pulled out one of my rulers and started marking the fabric with my chalk pencil.
This “could” have been hooped, but it wouldn’t have been a fun time for me because of the narrow width of the pant leg. To avoid this, I pulled out my newest seam ripper and started ripping out a side seam.
The bottom stabilizer was floated on the 5×7 hoop and on the wrong side of the pant leg. Two pieces of water soluble stabilizers were placed on the top aka right side of the pant leg. I doubled up on the top, because I noticed puckering when I initially started embroidering. So, why did I experience some puckering? The pants material is made out of a very lightweight knit. Additional support was needed to protect the fabric from all the stitching. In some places, there are numerous stitches. I most likely could have avoided doubling if I had medium or definitely heavyweight water soluble stabilizer on hand.
I did make one major mistake.
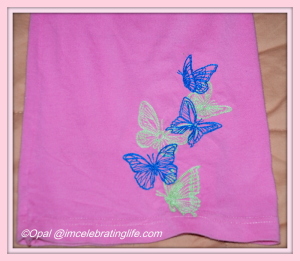
Can you spot what I did incorrectly? I should have swapped colors since the blue is darker than the green butterflies.

You know what? My daughter isn’t complaining and she received a lot of compliments about her pants today at school. I would say that these embroidered pants were a success!
She attends a private school and they normally have to wear a uniform, but since they had a walk-a-thon they were allowed to wear casual clothes.