Here’s another view of the same tulle petticoat pictures that I posted earlier today. However, I believe you can see the skirt a bit better with the darker background.
since I’m using a darker background.
This is a lovely project. I believe I’ll embroider these daisies again, next time I’ll use metallic thread; silver and pink. Part of me will be sad once it’s complete, but that’s fine. I’ll be designing more petticoats.
When working with tulle, I usually hand baste first before I even think about doing any type of machine sewing. Why? Tulle is a slippery fabric and while I know you can use tissue paper to help with this, I still prefer hand sewing even if that means it takes more time. I love hand sewing, for me it’s therapeutic. I don’t need electricity to create something beautiful. Just the basic tools and time of course.
Shimmery and slippery tulle!
How much hand basting are we talking about? It was a little over 50 yards of tulle, I hand sew fairly quickly, but that still was a lot. This petticoat has three layers of tulle, each layer was secured to the one above with the hand basted stitches. Afterwards, I went back and sewed those stitches with one of my sewing machines. In the above photo, I was using my Brother PC420 Project Runway.
My daughter loves watching the progression of her outfit. Since tulle can be slippery, I decided it might be best to have her working with fabric that isn’t as challenging. She readily agreed.
Here’s a close up of how it appears near the top of the petticoat. My daughter chose a simple floral design from Urban Threads. I believe I’ll finish the petticoat today. Later today, I’ll work on the dress, but for now I do believe I’ll take a tiny break. The elastic needs to be added to the waist and the actual petticoat needs a hem. For the tulle, I believe I’ll add a rolled hem, which means I’ll have to use my serger machine.
Would I have done anything differently?
In hindsight, I would have used chiffon for the actual petticoat, but that might not have been a great idea since I added the machine embroidered flowers? Well, it would have been doable, but I definitely would have needed a thicker stabilizer. I will be making other petticoats, the next one will most likely be for myself.
Although I have a lovely table to do all my cutting, marking, etc., I still prefer using the floor. My daughter tells me, it’s because I don’t have far to go. I’m 5′. Yes, she’s got jokes!
Oh, I’m wearing my favorite cold sweatshirt. It’s seen several washings, and has bleach spots in a few places, but I still wear it around the house.
My daughter also told me I have too much hair. She said, “Mom, I rarely get your face when I’m trying to take a picture!” My reply, “I’m not the subject the material is the focal point!”
She took this several hours ago. In the picture, you’ll see the beginning of a petticoat that I’m creating for her. I was adding additional marks (with my chalk pencil) for embroidery placement. Since that time, the embroidery was added (with much success I might add) and I’ve also hand basted one layer of tulle ruffle to the petticoat.
Later this afternoon, I’m hoping I have time to draft a pattern for a maxi skirt or pair of pants.
I already have the fabric set aside for the outfit. The only things left is to set aside the time to actually get that accomplished. Of course, that means pulling out the drafting paper, getting my rulers used for drafting, pencils and laying everything out on the large table. I already have the top that will compliment the pants or skirt. It’s that ruffled shirt that’s still waiting in the shadows for inspiration.
You know what would be awesome? Having time to actually start sewing the garment today. This new article of clothing will be a mix of machine and hand-sewn stitches.
Many of my sewing accessories are vintage. I use them because of their quality. I often wonder about the history of the items I own. Who used them before? How often did they use them and what was their life like?
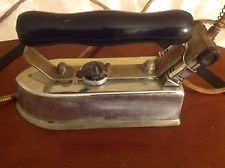
Recently, I finally got around to purchasing an “new to me” iron. I like an iron that is heavy. I also favor metal instead of plastic. At times, it seems you have to search long to find an iron with that trait. Take for example the one I have. It’s mainly plastic, and I’ve had it for a few years, but at times it can be unpredictable. Sputtering and spitting steam all over the place when it doesn’t want to cooperate. When it does, it smooths out the wrinkles, but without the added weight that I adore.
Often, I found myself drifting back to the old Proctor Silex steam iron that I used when I was a child. It was my fathers iron before he married mom. He let me have it since I loved it so much and so that iron followed me from elementary school well into my twenties. I only discarded it because one time I forgot to remove the water and when I turned it on, a few weeks later it sprayed out rusty brown water. I held onto it for quite some time, hoping it would recover, but it never did and so sadly I tossed it aside.
I’ve decided, finally, that it’s high time that I replace my modern iron with an antique heavy iron.
American Beauty Iron – 16 pounds
I immediately went to Ebay, found a reputable seller and purchased this iron.
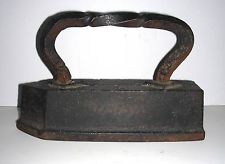
Sadiron – 20 pounds
Almost a week later, I went back to Ebay and placed a bid on the above sadiron. It weighs 20 pounds and was made in the 1800s. Yesterday, I was thrilled when I received the notification that I’d won! I should be receiving both later this week. With the sadiron, I’ll be using a new technique (to me) on some of my garment construction. Immediately after using a my dry press iron, I’ll follow with the sadiron.
I first heard about sadirons when I read Laura Ingalls Wilder books, Little House on the Prairie. I was seven and had been handsewing for one year.
“Then Ma took the sadiron out of the wagon and heated it up by the fire. She sprinkled a dress for Mary and a dress for Laura and a little dress for Baby Carrie, and her own sprigged calico. She spread a blanket and a sheet on the wagon seat, and she ironed the dresses.” Laura Ingalls Wilder, Little House on the Prairie
In the above video, Rory Duffy (bespoke tailor) talks about this technique shortly after the one minute mark. I’ve watched his The Making of a Coat video several times and I always seem to glean additional information. Take for example, using a paintbrush to apply water to the cloth. I’d been using a spray bottle. I’ll definitely try the paint brush on some of the garments I’m making and see how it compares to what I’m already doing.
We use cookies on our website to give you the most relevant experience by remembering your preferences and repeat visits. By clicking “Accept”, you consent to the use of ALL the cookies.
This website uses cookies to improve your experience while you navigate through the website. Out of these, the cookies that are categorized as necessary are stored on your browser as they are essential for the working of basic functionalities of the website. We also use third-party cookies that help us analyze and understand how you use this website. These cookies will be stored in your browser only with your consent. You also have the option to opt-out of these cookies. But opting out of some of these cookies may affect your browsing experience.
Necessary cookies are absolutely essential for the website to function properly. These cookies ensure basic functionalities and security features of the website, anonymously.
Cookie
Duration
Description
cookielawinfo-checkbox-analytics
11 months
This cookie is set by GDPR Cookie Consent plugin. The cookie is used to store the user consent for the cookies in the category "Analytics".
cookielawinfo-checkbox-functional
11 months
The cookie is set by GDPR cookie consent to record the user consent for the cookies in the category "Functional".
cookielawinfo-checkbox-necessary
11 months
This cookie is set by GDPR Cookie Consent plugin. The cookies is used to store the user consent for the cookies in the category "Necessary".
cookielawinfo-checkbox-others
11 months
This cookie is set by GDPR Cookie Consent plugin. The cookie is used to store the user consent for the cookies in the category "Other.
cookielawinfo-checkbox-performance
11 months
This cookie is set by GDPR Cookie Consent plugin. The cookie is used to store the user consent for the cookies in the category "Performance".
viewed_cookie_policy
11 months
The cookie is set by the GDPR Cookie Consent plugin and is used to store whether or not user has consented to the use of cookies. It does not store any personal data.
Functional cookies help to perform certain functionalities like sharing the content of the website on social media platforms, collect feedbacks, and other third-party features.
Performance cookies are used to understand and analyze the key performance indexes of the website which helps in delivering a better user experience for the visitors.
Analytical cookies are used to understand how visitors interact with the website. These cookies help provide information on metrics the number of visitors, bounce rate, traffic source, etc.
Advertisement cookies are used to provide visitors with relevant ads and marketing campaigns. These cookies track visitors across websites and collect information to provide customized ads.


 Many of my sewing accessories are vintage. I use them because of their quality. I often wonder about the history of the items I own. Who used them before? How often did they use them and what was their life like?